|
1973 19'4" Outrage Rehab
|
| sraab928 |
Posted on 06/17/08 - 1:19 PM
|

Member
Project Albums
Posts: 1282
Comments:
13
Joined: 12/27/05
|
Ok - I let the fans work for a bit - Things seem to have dried nicely. So today I fabbed up a custom hole cutter to fit in my PVC sleeves.
[IMG]http://www.whalercentral.com/images/photoalbum/album_28/whaleroutrage009_t1.jpg[/IMG]
[IMG]http://www.whalercentral.com/images/photoalbum/album_28/whaleroutrage010_t1.jpg[/IMG]
The PVC insert on the cutter keeps it centered on the existing hole - The extension was required to get to the lower drain from the fish box - That will be about a 6 inch tube.
Here is the result
The port transom splashwell drain
[IMG]http://www.whalercentral.com/images/photoalbum/album_28/whaleroutrage007_t1.jpg[/IMG]
Here is a piece of PVC for test fitting.
[IMG]http://www.whalercentral.com/images/photoalbum/album_28/whaleroutrage004_t1.jpg[/IMG]
Roughly what it will look like in place with epoxy.
[IMG]http://www.whalercentral.com/images/photoalbum/album_28/whaleroutrage006_t1.jpg[/IMG]
Gonna give her another 24 hours on the fans then install the pipe. The first layer of wood was a bit gooey (what I cut out with the hole saw) - but I appear to have good wood just beyond - When I poke it with a small screwdriver it doesn't stick so that seems to be a good sign.
Sorry for the pics - the boat is inside my work garage and lighting is an issue in the back - the flash of the camera made it a bit bright.
More to follow.
Edited by sraab928 on 09/24/08 - 5:50 PM
Scott
1974 21' Revenge w Mercury 200 ProXS V8 |
| |
|
|
| arthureld |
Posted on 06/17/08 - 2:10 PM
|

Member
Personal Page
Posts: 735
Comments:
7
Joined: 02/15/07
|
Great documentation Scott.
I found a pvc tube in my 1984 Outrage 20 when I replaced them all.
It seemed to work fine. Mine wasn't epoxied in either. It was just held in place with sealer. But, I don't think it leaked at all.
Best of luck with your project.
|
| |
|
|
| sraab928 |
Posted on 06/17/08 - 5:33 PM
|
Member
Project Albums
Posts: 1282
Comments:
13
Joined: 12/27/05
|
Thanks - I did this same drain tube project on a Grady Gulfstream last year. It came out great. If that o-ring is ever to leak it will never get inside the foam or wood. I plan to keep documenting the things I am doing to this boat on this thread. Piece by piece I hope to make her something to be proud of. Thanks for the encouraging words... they do help!
Scott
1974 21' Revenge w Mercury 200 ProXS V8 |
| |
|
|
| Derwd24 |
Posted on 06/17/08 - 7:22 PM
|

Member
Posts: 1607
Comments:
9
Joined: 05/09/07
|
Looking forward to more posts Scott, enjoyed following your progress so far, and even learned a thing or two! Keep it up, she'll be well worth the effort without question. Love the twins on the back too!
Dave - 1983 Outrage 22 |
| |
|
|
| Jeff |
Posted on 06/18/08 - 8:09 PM
|

Member
Posts: 1987
Comments:
34
Joined: 04/02/05
|
Scott,
Nice jig for boring!
1993 23' Walkaround Whaler Drive |
| |
|
|
| sraab928 |
Posted on 06/19/08 - 3:21 AM
|
Member
Project Albums
Posts: 1282
Comments:
13
Joined: 12/27/05
|
Thanks Jeff - its one of the advantages of having access to a mill and a lathe. That plug keeps it perfectly centered in the hole so you are making the hole bigger in all the right places. The first time I tried to do one of these last year on another boat I found out right away that you need something to hold it center or the hole saw will just "walk". If you ever need one made up let me know - I would be glad to help you out for a change.
I took some parts for my 13 to Frankford Plating yesterday morning so I also took some 19 parts.
Here are all the parts from the 19 ready to be rechromed. The plater says 2 to 3 weeks - Seemed very familiar with the Whaler parts.
[IMG]http://www.whalercentral.com/images/photoalbum/album_28/0729081248_t1.jpg[/IMG]
Today I will be cutting my pvc inserts and prepping for their install. I only have a half day at the shop so we will see how far I get.
Edited by Joe Kriz on 09/24/08 - 11:25 AM
Scott
1974 21' Revenge w Mercury 200 ProXS V8 |
| |
|
|
| Blue_Northern |
Posted on 06/19/08 - 8:15 AM
|
Member
Personal Page
Project Albums
Posts: 532
Comments:
5
Joined: 09/04/07
|
It is killing me to watch all this progress you have going on Scott. I have mine all cut up and the foam will be drying out for some time still before she starts to go back together. I have also been slammed every weekend so it seems like nothing is happening. Glad things are moving along with your project.
Rob
1973 Outrage/Lo-Pro Conversion |
| |
|
|
| sraab928 |
Posted on 06/19/08 - 5:51 PM
|
Member
Project Albums
Posts: 1282
Comments:
13
Joined: 12/27/05
|
Thanks Rob - You helped me get the motivation to get started - you were flying with yours and I was nowhere - I had to get my butt in gear. Trust me you will get caught up and pull ahead - my life is full of adventure and projects - Just today I got down to our shore house and decided to change the filters on my Grady... Well one was perfect and the other was well - Ewwww...
Now I have the floor up trying to figure things out - checking for crossed fuel lines, leaking fuel fills, etc, etc...
I have a thread going on at my local fishing site about it...
http://www.thebassbarn.com/forum/show...p?t=143962
Never ever a dull moment when you own so many boats....lol
Edited by sraab928 on 09/23/08 - 5:54 PM
Scott
1974 21' Revenge w Mercury 200 ProXS V8 |
| |
|
|
| sraab928 |
Posted on 06/19/08 - 5:57 PM
|
Member
Project Albums
Posts: 1282
Comments:
13
Joined: 12/27/05
|
Ok - now back to the Outrage project....
This morning I prepped the three through hulls - I put unthickened epoxy in each hole as a primer of sorts - I then sanded the exterior of PVC pipe inserts to ensure good adhesion. The next step was to coat the inside of the pipes with grease - This keeps the epoxy that gets inside from sticking - trust me it will get inside! - I then coated the pipe with my epoxy/microfiber mixture and coated the inside of the hole with the same - Then you insert the pipe into the hole and line it up. Then clean up the excess epoxy mess. Vinegar is a Godsend for this. I only have a few pics as I was messy and couldnt touch the camera too much.
Here is the pipe coated with Epoxy/Microfibers...
[IMG]http://www.whalercentral.com/images/photoalbum/album_28/0619081020_t1.jpg[/IMG]
Here is what it looks like after it inserted - Told you its messy!!
[IMG]http://www.whalercentral.com/images/photoalbum/album_28/0619081021_t1.jpg[/IMG]
Then of course cleaned up and waiting to cure.
[IMG]http://www.whalercentral.com/images/photoalbum/album_28/0619081037_t1_1.jpg[/IMG]
Well thats it for this week - I am away for the weekend - I will be back at it next week!
Edited by Joe Kriz on 09/24/08 - 5:34 PM
Scott
1974 21' Revenge w Mercury 200 ProXS V8 |
| |
|
|
| sraab928 |
Posted on 07/01/08 - 4:28 AM
|
Member
Project Albums
Posts: 1282
Comments:
13
Joined: 12/27/05
|
Got the motor covers back yesterday - My garage project is just about finished so she should be back inside today or tommorrow...
[IMG]http://www.whalercentral.com/images/photoalbum/album_28/0630081457_t1.jpg[/IMG]
I still need to decide what to do with the decals - and the lower units - The paint is good - but no where near as shiny. I may shoot them with clear to get them to match better. The starboard motor lower unit was already waxed and it just doesn't shine like the covers.
Edited by Joe Kriz on 09/24/08 - 11:26 AM
Scott
1974 21' Revenge w Mercury 200 ProXS V8 |
| |
|
|
| Blue_Northern |
Posted on 07/01/08 - 10:05 AM
|
Member
Personal Page
Project Albums
Posts: 532
Comments:
5
Joined: 09/04/07
|
Looks like you had a pretty good week of work on the outrage. I got a bit done myself this weekend. Be sure to check out my progress.
Rob
1973 Outrage/Lo-Pro Conversion |
| |
|
|
| sraab928 |
Posted on 07/01/08 - 5:20 PM
|
Member
Project Albums
Posts: 1282
Comments:
13
Joined: 12/27/05
|
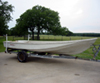
Got her back in the garage today - Put her on the cradle I built for my Rage - it held - but I think when I get it in place I will sure it up with Jack stands to be safe. It was quite a process but my 11 year old son and I got it done in about 30 minutes.
Here it is ready to go - I strapped the stand to the trailer and then anchored the boat to a heavy object...(my forklift)
[IMG]http://www.whalercentral.com/images/photoalbum/album_28/0701081650_t1.jpg[/IMG]
Pulled the trailer out slowly and the boat transfers from the trailer to the dolly...
Here she is ready to be somewhat easily moved around the shop - I will now get to work on the trailer - servicing bearings and bunks etc...
[IMG]http://www.whalercentral.com/images/photoalbum/album_28/0701081705a_t1.jpg[/IMG]
Hopefully when I go to the shop tomorrow she will still be standing....
Edited by Joe Kriz on 09/24/08 - 11:28 AM
Scott
1974 21' Revenge w Mercury 200 ProXS V8 |
| |
|
|
| ritzyrags |
Posted on 07/02/08 - 5:07 PM
|

Member
Project Albums
Posts: 1003
Comments:
36
Joined: 06/18/08
|
Wow,
That little trailer might just be the thing for my girl.
Any specs about the measurements and materials used?
The wheels seems to be 6" ?
My thoughts were on a similar way to take my girl of her trailer and put her on some "car wheel caddies" modified that is and put her in my garage for the colder months.
I was looking at the site today and there it it..
Wishing You Well,
Serge.
Dont lie
Dont Cheat
And dont give up.. |
| |
|
|
| sraab928 |
Posted on 07/02/08 - 5:10 PM
|
Member
Project Albums
Posts: 1282
Comments:
13
Joined: 12/27/05
|
Serge - The cross beams are 4 x 6 pressure treated - The bunks are two 4x4 pressure treated 8 footers. - The casters were professional grade - rated for 1000 pounds each - poly coated. They do make these stands out of metal - two smaller ones per boat - They have them on dealer showrooms.
Scott
1974 21' Revenge w Mercury 200 ProXS V8 |
| |
|
|
| sraab928 |
Posted on 07/02/08 - 5:59 PM
|
Member
Project Albums
Posts: 1282
Comments:
13
Joined: 12/27/05
|
Well I ran into a problem today..... I came in the shop this morning and a small puddle of water was on the floor towards the front of the boat - I got on the ground and looked under and found an old bad patch that was dripping water - It had been hidden by the keel roller of the trailer - Im guessing sliding it off the trailer disturbed it and now its revealing something I really dont want to see....water... any thoughts?
[IMG]http://www.whalercentral.com/images/photoalbum/album_28/0702081344_t1.jpg[/IMG]
Edited by Joe Kriz on 09/24/08 - 11:29 AM
Scott
1974 21' Revenge w Mercury 200 ProXS V8 |
| |
|
|
| ritzyrags |
Posted on 07/02/08 - 7:00 PM
|
Member
Project Albums
Posts: 1003
Comments:
36
Joined: 06/18/08
|
Is your hull slightly tilted forward or totally plumb?
Is there abrasions on the front section of the keel?
From your posted pictures, I see a small gouge on the bow..could be a possible point of entry.? I would survey the hull with a plastic hammer to see if there is a possibility of an air pocket.. that may have filled. Go at it with a lighted magnifying glass/lamp (as I have on my desk computer) and carefully crawl on the front section to find a point of exit for this water.I hope that no one is pulling a joke on you...
Dont lie
Dont Cheat
And dont give up.. |
| |
|
|
| ritzyrags |
Posted on 07/02/08 - 7:30 PM
|
Member
Project Albums
Posts: 1003
Comments:
36
Joined: 06/18/08
|
PS, Now that I used the magnify option, I can see the patch..up close.
Can't be a major as it's not gushing out..
You will have to take carefully; the old patch off ans assess your degree of invasion by putting a bucket under and seeing how much for how long.
The rest depend on the degree of saturation.
I was thinking of possibly putting my 19 upside down on skids to do hull repairs but am unsure that the "cap" integrity would take the 1500 LBS weight..
Serge.
Dont lie
Dont Cheat
And dont give up.. |
| |
|
|
| sraab928 |
Posted on 07/03/08 - 2:30 AM
|
Member
Project Albums
Posts: 1282
Comments:
13
Joined: 12/27/05
|
Thanks Serge - I plan on pulling the patch today and seeing what happens. I have had a large hole drilled in the bottom rear of the boat - Have had some water drain out - but basically just a damp spot every 24 hours or so - I had the boat tilted towards the rear up till this point - Now its completely flat - Once the patch is off I will probably tilt it to the bow and let it sit while I am on vacation next week -
I would not flip onto its cap - I really dont think the cap is made to support the hull. Just my opinion though - maybe others have better experience with this. If you have the means to flip you could make stands that would support the boat by the floor - sort of like sawhorses that would fit in between the cap. I cant imagine it would be easy to flip though.... and make sure the gas tank is capped or empty.... That would be a mess.
Scott
1974 21' Revenge w Mercury 200 ProXS V8 |
| |
|
|
| sraab928 |
Posted on 07/03/08 - 5:53 PM
|
Member
Project Albums
Posts: 1282
Comments:
13
Joined: 12/27/05
|
Got her in the corner of the shop and up on jackstands so I could get access to the patch area.
[IMG]http://www.whalercentral.com/images/photoalbum/album_28/0703080900_t1.jpg[/IMG]
I then drilled a one inch hole through the patched area. The initial bit of foam was wet - but the rest of the core sample was white and dry.
[IMG]http://www.whalercentral.com/images/photoalbum/album_28/0703080911_t1.jpg[/IMG]
I then went forward on the keel and drilled another hole - No water in this hole - The foam felt like it was slightly moist - but not soaked.
So as it stands - I have a one inch hole in the forward part of the keel - another about 6 feet back from that - and another at the stern. The front most one is not dripping at all - The mid and back are dripping - about a drop of water every minute or so. I have left for vacation - I put buckets under each whole - when I get back (a week from Monday) I guess we shall see where we are at.
Edited by Joe Kriz on 09/24/08 - 11:30 AM
Scott
1974 21' Revenge w Mercury 200 ProXS V8 |
| |
|
|
| Blue_Northern |
Posted on 07/25/08 - 9:28 AM
|
Member
Personal Page
Project Albums
Posts: 532
Comments:
5
Joined: 09/04/07
|
Scott - how if the refit going on your 19. I have not seen a post lately and like to follow your work.
Rob
1973 Outrage/Lo-Pro Conversion |
| |
|


