|
Drain tube problems
|
| litespeed |
Posted on 03/28/06 - 7:27 PM
|
Member
Personal Page
Posts: 67
Comments:
0
Joined: 05/26/05
|
I thought I would post this to help others that may be racking there brains over the same problem.
I have been researching drain tubes for weeks here and elsewhere to include local shops and all over the internet.
Finding the factory tubes proved to be pretty easy but I keep hearing how they crack, corrode and fall apart. So I bought the factory tubes with o-rings and was about ready to install them when I thought of PVC. Has anyone tried this?
It is too late for me... I already did it. It just makes more sense all the way around. It is readily available anywhere (IE: Home Depot, Lowes, etc...), it is easy to shape and cut. And it was very easy to install. I had to open up the rear foam about 1/16th of an inch to make room for the pipe. I tapped the 3/4 inch PVC in the hole, marked it, removed it and cut it. Tapped it in with a small hammer. Then I bedded both ends in with 5200. It looks to be a good, easily servicable solution to the brass drains.
The inside drain hole on my boat was pretty worn out so this was a great solution for me. It may prove to be a good solution for others with long drain tubes and or failing brass tubes.
I also plan to use a small piece of poly tubing for the anchor drain. Easily replaceable.
I used the thin wall PVC for the Drains. Not Sch. 40. I really did not see the need for that kind of strength down there. I'll post results good or bad in a few months. The boat will see a lot of abuse over the next few months during scalloping season, lobster season and the other fishing seasons.....
AJ
litespeed attached the following image:
[58.53Kb]
Edited by litespeed on 03/28/06 - 7:28 PM |
| |
|
|
| MW |
Posted on 03/29/06 - 12:56 AM
|
Member
Personal Page
Posts: 1827
Comments:
10
Joined: 01/08/06
|
Absolutely "GENIUS" ! ! ! and I need to replace the drain tube too ! With idea's like this, I'm glad that you're on the side of "GOOD" Not "EVIL". Thanks ! MW
|
| |
|
|
| drandlett |
Posted on 03/29/06 - 4:37 AM
|

Member
Personal Page
Posts: 146
Comments:
0
Joined: 03/01/06
|
AJ- seems like a great idea. could you give more details on how you were able to seal the inboard and outboard edges of the PVC to the hull? it seems like it would be hard to create a solid seal.
Thanks dana
|
| |
|
|
| litespeed |
Posted on 03/29/06 - 6:53 AM
|
Member
Personal Page
Posts: 67
Comments:
0
Joined: 05/26/05
|
drandlett wrote:
AJ- seems like a great idea. could you give more details on how you were able to seal the inboard and outboard edges of the PVC to the hull? it seems like it would be hard to create a solid seal.
Thanks dana
Dana,
It is a real tight fit on the outside. A little looser on the inside as you can see in the photo. I actually had to tap it in with a small sledge hammer. The outside does not even need sealant. But I sealed both ends in and out. I smeared some slow cure 5200 (blue) on my finger and ran it just inside the holes before inserting the pipe. Then I seal the outer edge with a little more and created a small lip wit the 5200. It is self leveling so it looks real professional. If for some reason it should start to peel off (it should'nt) it is easy to repair. And it will not leak because it is sealed on the inside too.
I hammered a 14" piece of that 3/4" thin wall PVC all the way through the hole so I could mark the pipe with a fine pencil. But first I had to remove a tiny amount of foam on the bottom of the hole to get the right angle to go all the way through. After marking the pipe and removing it again....... I cut just behind the lines on the hacksaw and then finished the rough edges with sandpaper. When the pipe is in the boat, it sits about 1mm inside the holes on both ends. I did this in case it gets bumped by an obstruction (nothing to bump or break).
This is a much better solution for me. If this does give me problems again it will be VERY easy to fix. And I can get the material right down the street.
The best part is that there are no specialized tools or parts required. I'm taking the brass tubes and o-rings back.
I am going to pull the tubes after the summer (about 4 months) and check the foam with a moisture meter. It is bone dry right now.
I'll post a photo of the finished job on Friday. The boat is in a freinds garage right now. It looks real nice. I would not do it if it looked bad or if I thought I would compromise the durability of my boat. This boat will get a lot of use. So it is important that it is right.
AJ
|
| |
|
|
| drandlett |
Posted on 03/29/06 - 2:56 PM
|
Member
Personal Page
Posts: 146
Comments:
0
Joined: 03/01/06
|
Thanks AJ, think i'll be trying the same thing on my 17' when i next get the chance.
Dana
|
| |
|
|
| drandlett |
Posted on 03/31/06 - 4:25 AM
|
Member
Personal Page
Posts: 146
Comments:
0
Joined: 03/01/06
|
AJ,
This may be a silly question but I am hesitant when it comes to exposing the inner foam etc. How do you get the old brass drain tube out without damaging the gel coat or making either the inboard or outboard holes larger?
Thanks,
Dana
|
| |
|
|
| litespeed |
Posted on 03/31/06 - 6:04 AM
|
Member
Personal Page
Posts: 67
Comments:
0
Joined: 05/26/05
|
Dana,
I gently collapsed the tubes with a medium sized screwdriver and a hammer. Very Carefully! You dont want to slip and scratch the GelCoat or Paint. If the boat has been painted you will want to take a razor knife and cut the paint around the drain first.
It seemed to work best to collapse the tube in several places and not just in one big spot.
Collapse the side that you will not be pulling from. IE: on my 13 the lower drain tube cannot come out on the inside so I collapsed the tube on the inside and pushed it out the back of the boat. It may take a little light tapping with a hammer to get it moving. But, once it is moving..... It will just slide right out.
I have the boat back in my yard now. I'll post a photo of the finished tube later today.
AJ
Edited by litespeed on 03/31/06 - 6:10 AM |
| |
|
|
| kevin nolan |
Posted on 03/31/06 - 1:45 PM
|
Member
Posts: 18
Comments:
0
Joined: 03/26/06
|
cool its now my turn to try but i think im going to go with the brass tube and o rings for 14 dollers and rent the flaring tool from a marina here for 5 dollers. so for 20 bucks. it will be new and original. thank so much kevin
|
| |
|
|
| litespeed |
Posted on 04/02/06 - 7:43 AM
|
Member
Personal Page
Posts: 67
Comments:
0
Joined: 05/26/05
|
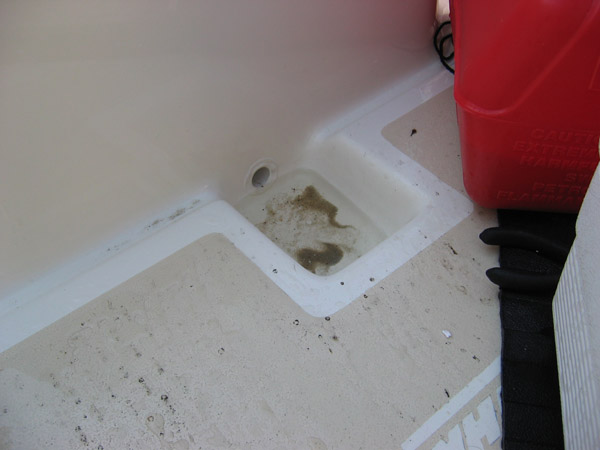
Dana,
Here is the finished drain. The "caulk bead" is bigger on the inside because of the size of the hole. If you dont have any damage around the hole...... The caulk bead will be much smaller. The caulk bead on the rear is barely visible.
The boat has already been used so it is dirty.....
AJ
litespeed attached the following image:
[59.63Kb]
Edited by litespeed on 04/02/06 - 8:08 AM |
| |
|
|
| kevin nolan |
Posted on 04/03/06 - 11:43 AM
|
Member
Posts: 18
Comments:
0
Joined: 03/26/06
|
I did my drain tube I don't like it but it will do. I think if I was to do it over I would put it through from the inside out mark the tube at the out side of transom and cut it 1/8 inch at the same angle of the mark around the tube. The flare on the outside never changed so it's at a 45 degree angle and the transom is not so I have space at the bottom of the tube between the transom and the flare the top is tight and the inside flare is perfect because I cut it at an angle. Oh, and both O-rings came off so I hope the 5200 3m is good stuff or I'll get water in my hull. Hope this helps someone.
Live and learn.
Kevin
Edited by Tom W Clark on 04/04/06 - 8:30 AM |
| |
|
|
| Tom W Clark |
Posted on 04/04/06 - 8:34 AM
|

Member
Personal Page
Posts: 4280
Comments:
7
Joined: 09/30/05
|
Kevin,
You absolutely should always cut the tube at the same angle as the hull. This is very important.
If you are using the O-rings (and you should) you need more than 1/8" extra sticking out of the hull. I recommend 5/16" extra with the O-ring on the opposing side in place. This allows enough extra tubing to create the flare and cover the 1/8" O-ring.
In your case I suggest you dig out the tube and try again. It's a simple matter and now that you're warmed up you will be able to do it right.
|
| |
|
|
| litespeed |
Posted on 04/04/06 - 3:16 PM
|
Member
Personal Page
Posts: 67
Comments:
0
Joined: 05/26/05
|
Kevin,
Heed Tom's advice here! This is important!!
If there is any doubt that it may leak..... DO NOT PUT IT IN THE WATER!!...
My boat spent over 6 months in a warehouse drying out because of a leak in this area.
My main concern in your case would be if the tubing split. This would be very difficut to see and could go beyond your 5200 bead on the inside.
As you have said...... The tubes are only 14 bucks. Just do it over.
If you have lost the o-rings, the flare was never right. You could 5200 them in there..... But they would be very hard to get out when they go bad again (and they will). You could damage the openings in the hull and the gel coat if you use too much 5200.
AJ
|
| |
|
|
| kevin nolan |
Posted on 04/05/06 - 5:08 PM
|
Member
Posts: 18
Comments:
0
Joined: 03/26/06
|
I don't know. I used 5200 and don't know if I should take it out. But if I do, should I cut of the flared end and cut both inside and out to the proper angle and then add 5/16 to each side, put on the orings then flare both sides? Why does the tube come with one side flared its at a 45 degree angle and nieither inside or out is at 45 degrees?
Edited by Tom W Clark on 04/05/06 - 10:20 PM |
| |
|
|
| kevin nolan |
Posted on 04/05/06 - 6:39 PM
|
Member
Posts: 18
Comments:
0
Joined: 03/26/06
|
Sorry, is it 5/16" overall or for each side like if I measure the tube at each side in and out I should add 5/16" or 5/16" to each end? I'm going to cut both ends of the tube each at an angle to match the inside and outside. Sorry to sound repetitive but more information is better than not enough. Thanks so much to you all.
Kevin
Edited by Tom W Clark on 04/05/06 - 8:47 PM |
| |
|
|
| Tom W Clark |
Posted on 04/05/06 - 10:26 PM
|
Member
Personal Page
Posts: 4280
Comments:
7
Joined: 09/30/05
|
Kevin,
I don't know what you mean when you are describing a 45 degree angle. The drain tubes in Whalers more often than not do NOT come out of the hull perpendicular to it, but they rarely are angled more than 5 degrees or so from perpendicular. The most severe angle I have ever measured was 13 degrees in the bow sump drain tube in a 22.
Yes, I would pre-flare one side on the tube at an angle top match the hull, then slide the tube through (with an O-ring in place under the flare) and then scribe and cut the other end so it ends up 5/16" beyond the hull.
You then anneal that end, butter up both ends with 5200 and pop the other O-ring on and then flare the other end. Clean up the mess and you're good to go.
|
| |
|
|
| litespeed |
Posted on 04/06/06 - 7:51 AM
|
Member
Personal Page
Posts: 67
Comments:
0
Joined: 05/26/05
|
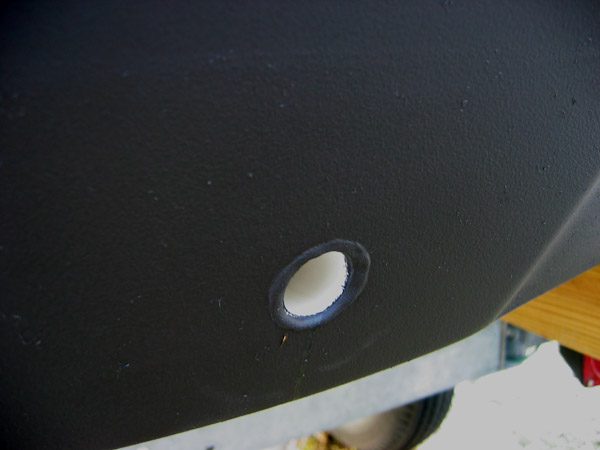
Oops.....
I forgot to post this with the above photo.
This is a pic of the finished PVC drain (outside). The "caulk bead" is much smaller becuase the hole was not damaged.
I painted the 5200 with bottom paint to keep the critters away.
The boat has been out every day for almost a week. Works like a champ!!
AJ
litespeed attached the following image:
[56.14Kb]
|
| |
|
|
| kevin nolan |
Posted on 04/06/06 - 5:29 PM
|
Member
Posts: 18
Comments:
0
Joined: 03/26/06
|
The tube comes flared at one end. It's a 45 degree angle. I'm going to cut the flare off. How do you flare just one end if there is no flared end and you cut both sides at an angle? The flaring tool flares both end at the same time. Thanks again, you're a lot of help. I'm glad I found this site. Sunday is the day I retry this. I hope I do OK. I think I will. Thanks a lot.
Kevin
Edited by Tom W Clark on 04/06/06 - 5:39 PM |
| |
|
|
| litespeed |
Posted on 04/07/06 - 3:54 PM
|
Member
Personal Page
Posts: 67
Comments:
0
Joined: 05/26/05
|
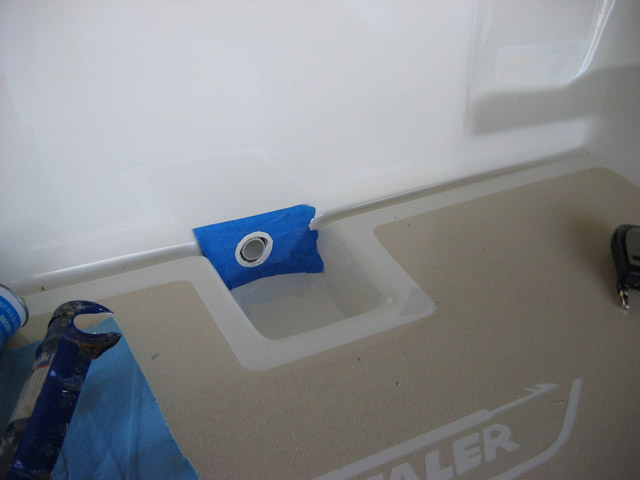
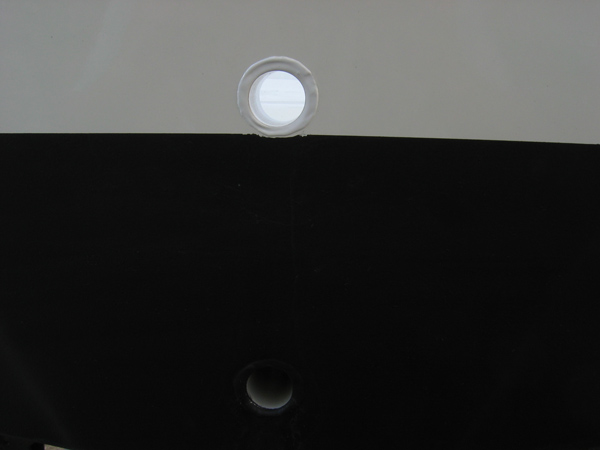
Ok,
I finally finished the PVC motor well drain today. I have been putting it off for a week. Only took about 30 minutes and I found out that the old drain was copper and was leaking . O-rings had dry rotted, caulk was gone and the tube was compromised. . O-rings had dry rotted, caulk was gone and the tube was compromised.
Luckily the wood was still pretty dry . .
Here are some pics of preping the PVC drains. This was a very tight fit and turned out well. I had to tap the PVC in with a hammer to make the marks for cutting. I could have made it look better. But, I was in a hurry.
Still turned out real nice . .
AJ
litespeed attached the following image:
[50.89Kb]
|
| |
|
|
| litespeed |
Posted on 04/07/06 - 3:57 PM
|
Member
Personal Page
Posts: 67
Comments:
0
Joined: 05/26/05
|
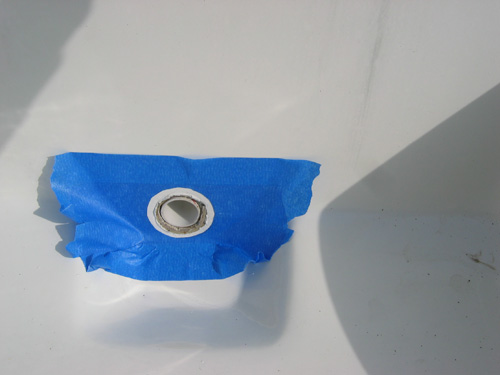
Here is the outside motor well PVC drain ready for 5200. Very tight fit!
AJ
litespeed attached the following image:

[45.03Kb]
|
| |
|
|
| litespeed |
Posted on 04/07/06 - 4:00 PM
|
Member
Personal Page
Posts: 67
Comments:
0
Joined: 05/26/05
|
Here is a shot of both PVC drains finished.
This turned out real nice. I can remove and replace them both in about 1 hour flat (if I need to).
Piece of cake. The PVC stuff is easy to find, easy to work with and easy to install.
Enjoy,
AJ
litespeed attached the following image:
[58.51Kb]
|
| |
|


