|
wiring mess
|
| duf |
Posted on 02/22/08 - 4:54 PM
|

Member
Personal Page
Photo Albums
Posts: 840
Comments:
9
Joined: 04/22/07
|
Welp, this is a photo of Raggedy's wiring with a large amount already removed, including the shifter cable and throttle cable. What a mess. I'm slowly working my way through all the wiring to figure out what is necessary, and what's just hosed. Sigh, have I mentioned I hate wiring??? The good news is I removed everything that is unique to the ETEC, S/T cable, instruments, engine harness, and oil reservoir and will reinstall them on the new boat, and reverse the installation. Once again, when i get done, all the useless wires that were left after non-use were decided, will be removed, and it will look like a semi-professional installation.
Joe/Jeff, e-mailing you picture as i can't get it to take. If you would post it to this thread, i'd apprecticate it.
And then tell me what you did, because i've tried to small text everything, which worked before, but is not this time.
Duf 
Edited by duf on 02/22/08 - 5:14 PM |
| |
|
|
| arthureld |
Posted on 02/22/08 - 5:33 PM
|

Member
Personal Page
Posts: 735
Comments:
7
Joined: 02/15/07
|
Sounds like you might want to concider paying someone to take on that job. I'm no good with wiring so that's what I'd do. Just my .02 
|
| |
|
|
| ioptfm |
Posted on 02/22/08 - 7:14 PM
|
Member
Personal Page
Posts: 1533
Comments:
3
Joined: 10/28/06
|
Duf...............how soon before you'll have the new one in the water for the maiden voyage? 
Tom
1979 Sport 15' |
| |
|
|
| Over the LINE |
Posted on 02/23/08 - 3:21 AM
|
Member
Posts: 8
Comments:
0
Joined: 08/04/06
|
I don't know exactally what kind of mess you have but I saved myself a lot of hassles on my 18' Outrage by building my new electrical panel on my workbench then installing it. I also gave up on salvaging all but engine and bow light wires very early on.
panel
installed panel
|
| |
|
|
| duf |
Posted on 02/23/08 - 6:38 AM
|
Member
Personal Page
Photo Albums
Posts: 840
Comments:
9
Joined: 04/22/07
|
Well, if all works out well will start pulling the Yamaha unique wiring and assorted plumbing week after next as i'm traveling on business next week unfortunately. So two saturdays from now, i am planning on having all the "stuff" exchanged and will take my new ride to where the ETEC is in storage and have it installed on the "new" boat. So sometime after two weeks, if all goes well, will be in the water and doing some serious crusing!!!
Sound advice on going to basic wiring as that is exactly what i'm doing today. If its not needed, its out of there. The prior owner of Raggedy must have been a killer for add on's as the wire bundle he ended up with is massive.
The new boats wiring is fantastic, neat as a pin and a fraction of the size of Raggedy, Way to Go Duf 2!
Hopefully Jeff or Joe get the pictures up, cause you have to see it to believe it. The good news about all this is, if i'm ever out on the water and have electrical issues, i'll know every wire by heart! Have i ever mentioned i hate wiring??
Duf
|
| |
|
|
| Jeff |
Posted on 02/23/08 - 7:01 AM
|

Member
Posts: 1987
Comments:
34
Joined: 04/02/05
|
Duf's Wiring
Jeff attached the following image:
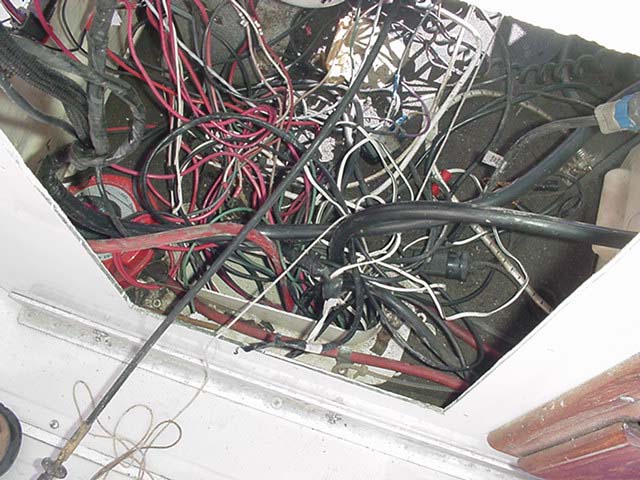
[94.75Kb]
1993 23' Walkaround Whaler Drive |
| |
|
|
| Phil T |
Posted on 02/23/08 - 7:31 AM
|

Administrator
Personal Page
Personal Album
Project Albums
Posts: 6986
Comments:
6
Joined: 03/26/05
|
Duf -
I have been in your shoes. Both my Montauk and Outrage 17 were a disaster.
While I will save you from the advice, here is a before and after to give you the inner strength for the job.
Outrage - Before:
Phil T attached the following image:
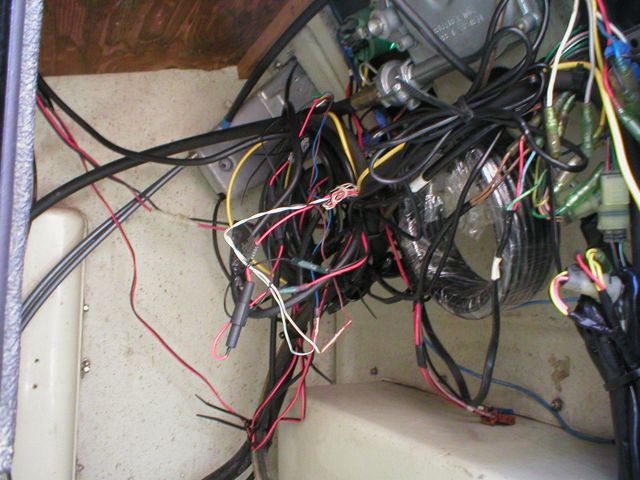
[63.49Kb]
1992 Outrage 17 I
2019 E-TEC 90, Viper 17 2+
2018 Load Rite Elite 18280096VT |
| |
|
|
| Phil T |
Posted on 02/23/08 - 7:34 AM
|
Administrator
Personal Page
Personal Album
Project Albums
Posts: 6986
Comments:
6
Joined: 03/26/05
|
Outrage AFTER:
Phil T attached the following image:
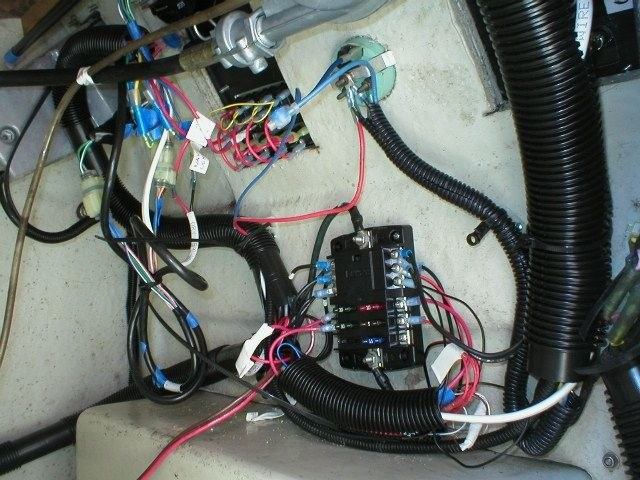
[77.41Kb]
Edited by Phil T on 02/23/08 - 7:38 AM
1992 Outrage 17 I
2019 E-TEC 90, Viper 17 2+
2018 Load Rite Elite 18280096VT |
| |
|
|
| kamie |
Posted on 02/23/08 - 8:01 AM
|

Member
Personal Page
Project Albums
Posts: 2975
Comments:
3
Joined: 11/04/05
|
Last year I redid all the wiring but mine is still a mess. I left things longer than I should just so I could make it neat. At lest it's all new, now I just need to shorten and bundle.
That will be done this spring.
|
| |
|
|
| boxman |
Posted on 02/23/08 - 9:16 AM
|
Member
Posts: 2
Comments:
0
Joined: 01/04/08
|
Hey bro,
thats even worse than behind my desk wiring from the computer and related crap
South
|
| |
|
|
| duf |
Posted on 02/23/08 - 3:06 PM
|
Member
Personal Page
Photo Albums
Posts: 840
Comments:
9
Joined: 04/22/07
|
CBO, you give me strength brother, that there is a light at the end of the tunnel. I spent 4.5 hours today and have a pile of wire at the nose of Raggedy. UNBELIEVABLE is all I can say. I'm down to just a few suspect wires, but will hang till my buds available to do continuity checks on the last few. No kidding, I will have to take a photo of what I pulled out, as it is truly mind boggling. Not just wiring, but all sorts of electrical junk. Regardless, it will be a rags to riches story when she is done, and will be a neat job as I don't do things half arsed even though Raggedy will be on the for sale block later this year. I won't be able to mess with her for a few weeks, but next trip will include some pipe cutters to fix a terrible light installation, and a grinder to take out a hideous stereo installation. Its all good and I enjoy it regardless, as it's a much more pleasureable therapy then the paying job!
Duf
|
| |
|
|
| ioptfm |
Posted on 02/23/08 - 3:47 PM
|
Member
Personal Page
Posts: 1533
Comments:
3
Joined: 10/28/06
|
That is a mess! What's really frustrating is when someone makes connections and has no regard for color-coding or organization. I've traced wire before that went in one side blue and came out the other side orange. Used black for hot and red for ground...........You're smart to rip it all out and go for the necessary ones only...........I would install a wiring buse in for later connections though
Tom
1979 Sport 15' |
| |
|
|
| Phil T |
Posted on 02/23/08 - 5:45 PM
|
Administrator
Personal Page
Personal Album
Project Albums
Posts: 6986
Comments:
6
Joined: 03/26/05
|
Duf -
I am laughing, truly laughing. (With you, not at you)
I had the same thing. I have photos of all the electrical tape (rolls and rolls worth), a dozen t-lock connectors, spools of extra wires from almost every accessory. The Sonar power/data wire was 30' long in a coil. It only had to travel 9" to make a connection. I had many wires that had a splice that was spliced on a splice. Yeeeuccchhhh!
Let me forewarn you. When you start putting it back together, try to keep your temper. As you start to see how straight forward it is and can be, you will curse the shmuck who did such a poor job.
Post or send a photo as you go. All we have is snow to look at outside.
1992 Outrage 17 I
2019 E-TEC 90, Viper 17 2+
2018 Load Rite Elite 18280096VT |
| |
|
|
| Derwd24 |
Posted on 02/23/08 - 6:00 PM
|

Member
Posts: 1607
Comments:
9
Joined: 05/09/07
|
So do you guys actually color code, running different color wires for different circuits? Is that your plan Duf? I ask because my 22 is very similar to yours and I'll be rewiring in the spring, starting to think about best ways to do it now in terms of wiring, best switches to use, main breaker or not, etc....
|
| |
|
|
| arthureld |
Posted on 02/23/08 - 6:20 PM
|
Member
Personal Page
Posts: 735
Comments:
7
Joined: 02/15/07
|
You guys are amazing. Some day I need to stop working 80+ hr/week and take some time to tinker with my toys.
|
| |
|
|
| ioptfm |
Posted on 02/23/08 - 6:51 PM
|
Member
Personal Page
Posts: 1533
Comments:
3
Joined: 10/28/06
|
Derwd24, You asked about color code...by all means do it...........I had a 40' Sport Fish and if we didn't use color code it would be virtually impossible to determine what goes with what. Works good on the smaller boats too. Other things you can do is buy a number kit from lowes or somewhere. It is a sheet that has multiple numbered stickers on it and you can number each end of a wire once you determine what it goes to and you will have somewhat of a road map to everything. You can also buy different colored electrical tape and color code the wire on the ends with the different colors. Anything to make it simpe for you later down the road. Multiple Buse bars are a big help too
Tom
1979 Sport 15' |
| |
|
|
| MW |
Posted on 02/24/08 - 2:32 AM
|
Member
Personal Page
Posts: 1827
Comments:
10
Joined: 01/08/06
|
A color code ? are you kidding me ? My previous owner liked "Red", red for "EVERYTHING", did'nt matter if it was a ground, Pos, or anything else, it was diced, spliced, and zipped all in red wire, if ya threw a switch it would crackle and smoke and blow fuses. I showed it to a friend of mine that knew boats, he said "this is how you fix this", and proceeded to pull every wire off the boat, with my jaw hitting the ground. He said "You can't fix this, you have to run "NEW" wire. He showed me how to solder a "Marine Connection", and before you knew it I had the first wire done, then I just stayed on it, it went faster than I thought, I cleaned up the "Terminal block" and "Buss Bars", I added "In-line" fuses etc. Boat electric is not that hard, it's only 12 V, and + and --, you just have to stay on it, e-mail is always open if you need any help <mwhalen11550@yahoo.com> ( live operator's are also standing by here), C'mon, YOU can do this if "I" can, plus you have an "Army" of "Whaler" help here ! you'll need:
soldering gun ( a $5 gun works fine from "Homey Depot")
thin silver solder (Homey)
heat shrink tubing (Homey)
a bottle of "liquid lectric tape" (Boat store, no getting around that)
wire cutter/stripper (Homey)
cable ties (Homey)
wire terminal connector kit (auto store or "Homey Depot)
wire (use Northern tool, much cheaper than a marine store, sometimes "Homey" has it)
a 12 volt "test light" (auto store)
"It's important that you do it yourself because, if something goes wrong, you'll know where to look, also the boat yard is Going to murder you with the labor cost of re-wiring.
mw
Edited by MW on 02/24/08 - 2:38 AM |
| |
|
|
| duf |
Posted on 02/24/08 - 4:06 AM
|
Member
Personal Page
Photo Albums
Posts: 840
Comments:
9
Joined: 04/22/07
|
A lot of good advice here guys. I do consider myself a novice when it comes to electrical work, but this is simple stuff. As CBO mentioned, i think one of the most important things is, don't lose your temper, and as MV said, take your time. I gave it 4.5 hours yesterday and eliminated a ton of wire. As i said, i'm no electrican but its already 100% better then it was, and the worst i had to deal with (gonna hurt you guys here) was sweating my butt off as it was close to 80 and lets face it, trying to get two hands inside my super console ain't easy. I'm going to re-wire the reds to be hot, and black to be ground for certain systems, and will probably use a different color cfor the hot line on my other systems. I had to laugh, the previous owner mentioned the bow lights didn't work and while i had the floor panels up to the right and left of the console came across some grey wires that didn't go anywhere. How much you want to bet they go to the bow lights. 
more pictures later!
Duf
|
| |
|
|
| kamie |
Posted on 02/24/08 - 6:54 AM
|
Member
Personal Page
Project Albums
Posts: 2975
Comments:
3
Joined: 11/04/05
|
hmm since the wires for my bow lights are grey and black
now about the 80 degree and sweating part, feel free to send it up my way. it's 36 now and going to top out at 46. Every time it finally breaks 50, I am stuck in the office. I was hoping to drop the boat in the water mid March, but looks like that will slide since it's not warm enough to get all the work done.
|
| |
|
|
| Phil T |
Posted on 02/24/08 - 7:53 AM
|
Administrator
Personal Page
Personal Album
Project Albums
Posts: 6986
Comments:
6
Joined: 03/26/05
|
I admit I am a novice and have only been able to do my projects with the advice of you guys.
Prior to cutting, I made a crude wiring diagram of the existing in order to understand. I also did a new diagram to help me on my materials list, routing and adding switches, etc. I did get the color codes back to what they should be, only since I could see where they changed. In addition, I made labels (see the white tabs in the photo above) and attached them at both ends of a wire. This way I know what a wire is for.
Putting it back together is the fun part.
Edited by Phil T on 02/24/08 - 7:54 AM
1992 Outrage 17 I
2019 E-TEC 90, Viper 17 2+
2018 Load Rite Elite 18280096VT |
| |
|


