|
Painting my Boat Motor
|
| dougt |
Posted on 09/29/14 - 1:15 PM
|

Member
Personal Page
Posts: 179
Comments:
0
Joined: 06/29/14
|
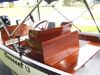
My 1996 Johnson 40hp was looking a little tired, so I decided to try to paint it and spiffy it up a bit.
I cleaned it real good with a de-greaser than sanded with 400 sand paper. A few rough spots I used 150 grit followed with 400. Then a final wash, rinse and dry in the sun for a couple hours. I used my air compressor to blow water out of any small collection areas. Taped off around engine mount, a couple drop clothes and started priming. I used Rustoleum 2X gray primer. I've had good luck with it and easy to apply. We'll see how it holds up.
I'll let it dry in the sun for a couple days and then spray a gloss black. I figure it can't look any worse than it did. I'll report back with pictures of the black and how it holds up this winter in Florida.
If you click on the right side of each picture, it should advance to next.
My $20 paint job :-)
http://s1372.photobucket.com/user/dou...sort=1&o=7
Doug
Edited by dougt on 09/29/14 - 1:26 PM
1996 Sport GLS 13' - 1996 Johnson 40hp, 2 Stroke |
| |
|
|
| Tom C2 |
Posted on 09/29/14 - 3:41 PM
|
Member
Posts: 18
Comments:
0
Joined: 01/24/14
|
Thanks for showing this procedure. I plan on doing the same with my Johnson 60 this winter. Have followed your restoration with interest. Have been working on a 1988 15 SS since Dec. last year. Hope to get it in the water before cold weather. 1988 15 SS 60 HP Johnson
|
| |
|
|
| dougt |
Posted on 09/29/14 - 5:25 PM
|
Member
Personal Page
Posts: 179
Comments:
0
Joined: 06/29/14
|
Thanks Tom,
This was a great boat to learn on. Can't wait for a 15ft or 17ft in a year or two. Can't wait to see some pictures. Best wishes, Doug
1996 Sport GLS 13' - 1996 Johnson 40hp, 2 Stroke |
| |
|
|
| MG56 |
Posted on 09/29/14 - 7:54 PM
|
Member
Personal Page
Posts: 355
Comments:
0
Joined: 05/11/13
|
Rattle can paint is not very durable. You are doing great work but the finish product is not worthy of your effort.
I use spray can paint all the time but it will not hold up to UV & a marine environment.
|
| |
|
|
| dougt |
Posted on 09/29/14 - 8:10 PM
|
Member
Personal Page
Posts: 179
Comments:
0
Joined: 06/29/14
|
MG56,
I am sure you're right, but I only have about 4 hrs in this job.
Not going to spend a lot of time or money on this at the moment, but I want to see if I can get this to last 6 months.
I do intend to use a good marine or automotive top coat.
Not much work to redo it later. Have to test and see the results myself.
If nothing else, I'll save someone else from repeating this process :-)
This guy did an out drive with Rustoleum enamel. Has 25 hours on it so far and still looks same as day he did it.
https://www.youtube.com/watch?v=M-PHW...-PHW1gxtj8
Doug
Edited by dougt on 09/29/14 - 8:30 PM
1996 Sport GLS 13' - 1996 Johnson 40hp, 2 Stroke |
| |
|
|
| ernest brooks |
Posted on 09/30/14 - 9:31 AM
|

Member
Personal Page
Posts: 77
Comments:
0
Joined: 03/16/12
|
Hey Doug; Been thinking of doing my motor somewhere down the road, and like you probably won't get too involved. My brother in law made a small wooden sailboat. about 9 foot, and painted entire thing inside and out with rustoleum enamel. Quart can stuff, not spray. Its been about three years now and still looks as new as the day it was finished. Of course he doesn't use it all that often, garaged mostly, but I think its a good economical way to go for those of us who aren't out in the water every day.
|
| |
|
|
| dougt |
Posted on 09/30/14 - 9:52 AM
|
Member
Personal Page
Posts: 179
Comments:
0
Joined: 06/29/14
|
Thanks Ernest.
Here's after one coat of Rustoleum Professional. Same as used in the Youtube Video. It went on nice, looks plenty good. I didn't touch primer, just went right over it while clean. No sanding.
I'll probably let it dry 48 hrs and put a 2nd coat on if I think it needs it.
Now I have to see if I can buff the cover up a little. If not, I'll hit it with a coat of clear.
Here's a link to top coat.
http://s1372.photobucket.com/user/dou...=1&o=0
I won't have it in the water until Nov. 1, so it should have a good time to cure out. I'll keep you posted as to how it's holding up after a month in the water.
I left the zincs in place because I plan on replacing with all new once I get down South. No one has them in stock here and the ones available on the internet didn't match part #'s exactly. I'll just take boat to dealer in town once I get there.
Doug
Edited by dougt on 09/30/14 - 9:57 AM
1996 Sport GLS 13' - 1996 Johnson 40hp, 2 Stroke |
| |
|
|
| ernest brooks |
Posted on 09/30/14 - 3:52 PM
|
Member
Personal Page
Posts: 77
Comments:
0
Joined: 03/16/12
|
Doug; will you be leaving your boat in the water during your stay? If so I'd be interested in knowing how the paint holds up.
|
| |
|
|
| dougt |
Posted on 09/30/14 - 4:49 PM
|
Member
Personal Page
Posts: 179
Comments:
0
Joined: 06/29/14
|
Ernest,
The current plan is yes. I am planning on leaving it in the water at my brother-in-laws dock. He doesn't have a lift, so I'll pull it once a week to wash the bottom. I'll see how often pulling it is required once I get there and monitor, Maybe I can go 10 days.
I'll let you know around Dec. 1 how it's holding up.
Best regards,
Doug
1996 Sport GLS 13' - 1996 Johnson 40hp, 2 Stroke |
| |
|
|
| dougt |
Posted on 10/02/14 - 11:44 AM
|
Member
Personal Page
Posts: 179
Comments:
0
Joined: 06/29/14
|
Well,
The cowling didn't polish up very good at all, had a couple dings and the top was scuffed from engine cover.
I wasn't going to spring for new decals, so I taped off decals, primered and painted same as engine.
Looks much better and is a 2ft paint job. a few dust specs, but shiney.
In one of the pictures, you can see the reflection of my blue shirt.
Sanded with 250 git, primered and painted. No additional work. About 1 hour effort.
I could sand with 800, clear coat, sand with 1000 and polish, but not worth the effort at the moment.
Again the devils in the durability, but that will be answered this winter.
http://s1372.photobucket.com/user/dou...=1&o=0
Doug
Edited by dougt on 10/02/14 - 11:46 AM
1996 Sport GLS 13' - 1996 Johnson 40hp, 2 Stroke |
| |
|
|
| wing15601 |
Posted on 10/02/14 - 4:31 PM
|
Member
Posts: 699
Comments:
0
Joined: 07/14/12
|
Great job on that engine, Doug. Now if it holds up in that southwest Florida environment it will last a very long time anywhere else. I would be interested in a follow up in a year.
I winter in Ft. Myers and summer in St. Joseph, Michigan. It’s now about 12 years since I’ve joined this group. I gave my 1972 whaler to my daughter and sold the 17’. Bought an O’Day 28 sailboat and sailed on Lake Michigan. Yesterday I bought a 2005 130 Sport. |
| |
|
|
| dougt |
Posted on 10/02/14 - 4:33 PM
|
Member
Personal Page
Posts: 179
Comments:
0
Joined: 06/29/14
|
Thanks Wing,
I'll have to look you up in Florida. I bought a condo last year in Cape Coral, so I am right across the bridge from you :-).
Doug
1996 Sport GLS 13' - 1996 Johnson 40hp, 2 Stroke |
| |
|
|
| Binkie |
Posted on 10/02/14 - 6:10 PM
|
Member
Personal Page
Posts: 2012
Comments:
0
Joined: 12/19/05
|
The correct way to paint an outboard to get a factory paint job using only rattle can paint. First remove the engine from the boat and mount it on a stand on rollers so it can be moved around. Then go to the local auto paint store and get a couple of spray cans of aircraft aluminum paint remover. move the engine outside and cover everything that won't be painted. BTW always wear gloves, glasses (old sun glasses) or whatever, and long pants. Now spray everything you want to paint, put cardboard on the ground to keep the remover from staining concrete. Let it sit now for 20-30 minutes, not in the sun. Now take your pressure washer, and blast the paint remover off. This will make a big mess,(I hope your car isn't sitting nearby) so wash the mess(old paint) off the driveway with the pressure washer. You probably have to do this twice, and you will be left with an outboard devoid of paint except for most of the initial primer applied at the factory which won't and does not have to be removed. This primer is called zinc chromate primer. It is not available anymore under that name . It is greenish color. It is now called Self Etching Primer available at the auto parts store. So pick up a can of this primer. This is the right primer to coat aluminum before painting. Sand everything smooth with 220 or 300 wet or dry sandpaper, and paint everything with the primer. Let the primer dry for a day or so, now just scuff sand the primer, and then paint two or three coats of spray paint that you bought from you outboard dealer. If you go black, you can get it from the auto parts store. What you do after this is up to you. It should look great and only need a couple of coats of Carnauba wax. Thats all I do. you could color sand it and clear coat it, and make it look as good as your new car.
This sounds very involved but it's easy to no and its not taxing work and the results are worth it and it will look good for years.
Rich |
| |
|
|
| dougt |
Posted on 10/02/14 - 6:32 PM
|
Member
Personal Page
Posts: 179
Comments:
0
Joined: 06/29/14
|
Thanks for sharing that info Binkie,
Hopefully this will last the winter and I'll try your technique next Spring.
Your boat if awesome! That would be worth a drive to Tampa :-)
How are you coming on having interiors for sale?
Best regards,
Doug
Edited by dougt on 10/02/14 - 6:34 PM
1996 Sport GLS 13' - 1996 Johnson 40hp, 2 Stroke |
| |
|
|
| dougt |
Posted on 10/04/14 - 2:05 PM
|
Member
Personal Page
Posts: 179
Comments:
0
Joined: 06/29/14
|
Motor and cover put back together.
Before and after side by side pictures.
http://s1372.photobucket.com/user/dou...=1&o=0
Doug
1996 Sport GLS 13' - 1996 Johnson 40hp, 2 Stroke |
| |
|
|
| Binkie |
Posted on 10/04/14 - 7:49 PM
|
Member
Personal Page
Posts: 2012
Comments:
0
Joined: 12/19/05
|
Doug, thank you for the compliments. As far as building that interior for sale. well it turned out to be alot more work than I anticipated, and I don't know how I would ship one. The boat was originally a STRIPER model and I have the Striper side console sitting in my shed. I was thinking of using that console as a plug, and then building a mold from it and turning out some replica Striper consoles for sale. Converting any 15 foot Whaler into a Sriper is probably one of the simplist conversions possible. All you would need is a replica console, and a couple of pedistal seats, that are easilly obtainable at marine stores. I think that console would be adaptable to a 13 footer also.
Rich |
| |
|
|
| wlagarde |
Posted on 10/05/14 - 4:12 PM
|
Member
Personal Page
Project Albums
Posts: 442
Comments:
2
Joined: 07/21/13
|
Binkie wrote:
The correct way to paint an outboard to get a factory paint job using only rattle can paint. First remove the engine from the boat and mount it on a stand on rollers so it can be moved around. Then go to the local auto paint store and get a couple of spray cans of aircraft aluminum paint remover. move the engine outside and cover everything that won't be painted. BTW always wear gloves, glasses (old sun glasses) or whatever, and long pants. Now spray everything you want to paint, put cardboard on the ground to keep the remover from staining concrete. Let it sit now for 20-30 minutes, not in the sun. Now take your pressure washer, and blast the paint remover off. This will make a big mess,(I hope your car isn't sitting nearby) so wash the mess(old paint) off the driveway with the pressure washer. You probably have to do this twice, and you will be left with an outboard devoid of paint except for most of the initial primer applied at the factory which won't and does not have to be removed. This primer is called zinc chromate primer. It is not available anymore under that name . It is greenish color. It is now called Self Etching Primer available at the auto parts store. So pick up a can of this primer. This is the right primer to coat aluminum before painting. Sand everything smooth with 220 or 300 wet or dry sandpaper, and paint everything with the primer. Let the primer dry for a day or so, now just scuff sand the primer, and then paint two or three coats of spray paint that you bought from you outboard dealer. If you go black, you can get it from the auto parts store. What you do after this is up to you. It should look great and only need a couple of coats of Carnauba wax. Thats all I do. you could color sand it and clear coat it, and make it look as good as your new car.
This sounds very involved but it's easy to no and its not taxing work and the results are worth it and it will look good for years.
Yes Yes Yes - Binkie - This is the exact procedure I used to recently refinish an extra lower unit I purchased and rebuilt as a spare for my motor and the result was like the factory finish: http://www.whalercentral.com/userphot...to_id=1848
1976 Sport 15 w/ 2005 50hp Nissan 2 stroke |
| |
|
|
| Finnegan |
Posted on 10/05/14 - 8:56 PM
|
Member
Posts: 1925
Comments:
16
Joined: 05/02/08
|
Always nice to see a Johnson repainted Mercury Phantom Black!!
If black is the color of choice, for not much money I have discovered that Mercury's own and Quicksilver branded 3 part paint system in spray cans is really excellent, and holds up for years if directions on the cans are followed closely.
1st is the etching gray primer specifically for marine aluminum, mandatory for bonding to aluminum, number of coats as necessary. This is the key to long life of a paint job. Then, after some sanding, within an hour, two coats of black paint must be applied, The third application is the clear coat, which also must go on within an hour or less of the black paint. Evidently, all three cure and bond to each other. Once you start the primer, you go all the way to the clear coat in a total of about two hours, with two coats of each phase.
After curing for a couple of days, you can then wet sand with #1500 or #2000, and buff with 3M Finess-it II followed by a clear coat scratch remover (I use KIT). The result is a factory looking paint job specifically for the marine environment.
|
| |
|
|
| dougt |
Posted on 10/06/14 - 6:35 AM
|
Member
Personal Page
Posts: 179
Comments:
0
Joined: 06/29/14
|
Good points taken Finnegan.
I do like the Mercury black :-)
Thanks a bunch.
Doug
1996 Sport GLS 13' - 1996 Johnson 40hp, 2 Stroke |
| |
|
|
| dougt |
Posted on 12/07/14 - 6:34 PM
|
Member
Personal Page
Posts: 179
Comments:
0
Joined: 06/29/14
|
5 Weeks in Florida, 2 weeks in straight in slip, about 20 hrs run time and paint still looks like the day I left Ohio.
FYI,
Doug
1996 Sport GLS 13' - 1996 Johnson 40hp, 2 Stroke |
| |
|


